Re-skinning for beginners (that's me)

Creating and Editing Rollingstock
User avatar
Gumboots
CEO
Posts: 4813
Joined: Mon Aug 13, 2012 4:32 am
Location: Australia

Re: Re-skinning for beginners (that's me) Unread post

Got something else figured out. I think WPandP had a minor point wrong in his Rolling Stock skinning ideas thread.
WPandP wrote:Update on Cuts of Cars:

I've done all that I can think of, but it appears that there is some sort of hard limit to how much a truck can flex or rotate, when tracking around a curve. The wheels aren't really attached to the rails, as they would be in real life; rather, the wheels are attached to the truck, which is attached to the body, and the body attaches to the track at its center point.
Having looked into file structure, the bit I underlined doesn't make sense. There is an additional file called *****L_TrackPoint.3dp (for locos) or *****T_TrackPoint.3dp (for tenders) or CaboA_TrackPoint.3dp (for caboose A skin) with similar files for cargo cars. It seems that these are what really define the attachment points to the tracks.

Having done a couple of quick checks of the coordinates from these files, I found that with an Atlantic the points correspond to where the two pairs of drivers hit the rails, and with a tender they correspond to roughly halfway along each tender truck. This makes perfect sense, which is always nice.

This is also potentially useful for things like Garratts and multiple-segment car mods. If the actual track attachment points can be defined to any forward or rear position, there is a lot more scope for getting better geometry around curved track.

For example, if the track points for a Garratt central unit are placed to coincide with the centres of the chassis pivots, then on a tight curve the body should appear to hang inside the track slightly, just as it should. There will still have to be some small amount of fudging (to balance chassis pivots with centres of driving wheelbases, which are slightly different) but it should be fine in the game after a bit of tweaking.

Similarly, it should be possible to use this to help the geometry of multiple segment cars. By placing the track points roughly halfway along each segment of a two segment car, the length points that the game thinks it has for a single car should be less of a problem around curves. That would still need some fudging too, to deal with truck attachment points to the body, etc, but it's better than nothing. !*th_up*!
User avatar
Gumboots
CEO
Posts: 4813
Joined: Mon Aug 13, 2012 4:32 am
Location: Australia

Re: Re-skinning for beginners (that's me) Unread post

Right, more goodies.

I am assuming that anyone who wants to attempt this will be using this app for viewing the file: 3D Object Converter. Note that it's no good for saving/exporting RRT3 .3dp files. It's only good for viewing them. Nonetheless, it is very good for that, and enables you to see changes far faster than if you had to load the edited file into the game and run it.

Attached is a screenshot which shows the last definitions of points (ie: just before the triangles definitions for graphics start) from the H10/Berkshire L_Body.3dp file.
z_coordinate_example.png
z_coordinate_example.png (108.85 KiB) Viewed 8852 times

The next shot shows where they map to the image. You can see the narrow triangle about halfway down on the left edge. All 6 are identical, so are stacked on the same region of the image.

Image


Anyway, I found a handy trick while mapping the Body.3dp. When mapping body files, you need all the handy tricks you can get. :mrgreen:

The left four columns in the hex are for the z (vertical) coordinates. As you can see, each triangle has the same value for two points on its base, and a different (higher) value for the tip. The trick is to use the z coordinate to help ease of mapping.

The way the hex is written (using IEEE754 format) the value 60 E5 0A 3F, at the start of the third row, translates to 0.543 units above the track (roughly 5 1/2 inches to scale). If you change the hex value to 60 E5 0A BF, that alters it to -0.543. This means that whenever you see a z value that has 3F in the fourth column, by simply changing the 3 to a B that point will be flipped to mirror beneath track height. Using this trick, it's quick and easy to alter a number of related points to mirrored under the baseline, so you can easily see which points do which bits of the body.

There's a similar trick with z coordinates that have 40 or 41 in the fourth column. They can be flipped to negative by changing the fourth column to C0 or C1. So, to mirror the upper tips of these triangles beneath the track, all that's required is to change the z value to E2 E9 D9 C0. These tricks will work on any points on the body. The important thing to remember is to change a 3 to a B and a 4 to a C. I found this was the best way of getting quick visualisation of what the points do.

CAVEAT: Since the hex editor writes straight to the file, it wont undo edits after the file is saved. To get around this, I worked with two copies of the file opened. This allowed me to keep a visual reference of the original code, just for safety.
Last edited by Gumboots on Fri Aug 23, 2013 8:19 pm, edited 3 times in total.
User avatar
Gumboots
CEO
Posts: 4813
Joined: Mon Aug 13, 2012 4:32 am
Location: Australia

Re: Re-skinning for beginners (that's me) Unread post

Next bit: triangles for graphics. :mrgreen:

This works the same way for complicated loco body files as it does for simple bogie files. Carrying on from the first shot in the previous post, you can see code for the first two triangles here, with the first one highlighted.
first_triangle_definitions.png
first_triangle_definitions.png (18.61 KiB) Viewed 8851 times
This calls Points 3, 2 and 5. Where are they and what do they do? It turns out that the first 8 points in the case of this loco (no guarantees for any other loco) define the rear face of the firebox. The firebox/boiler/smokebox combo is modelled as a nonagon in cross section, but with the centre/bottom vertex missing. Those faces would be hidden by the chassis, etc, so the devs left them out to save code.

By checking what the hex means when translated into English, I know that these points (not all points) run from lower left and clockwise, when looking at the loco from the rear. They are mostly hidden by the cab, so I've shunted the last one out sideways so it's visible.
first_body_points.png
first_body_points.png (103.92 KiB) Viewed 8851 times
As the screenshot says, the first point is numbered as zero in the code, so Point #2 is actually the third block of twelve in the highlighted section. The eighth point, that has the extra highlighting in red, is called 07 00 00 00 in the triangles stuff. !*th_up*!

By checking the unwrapped coordinates overlaid on the graphic, you can see this first triangle. The rear end of the firebox is at upper left of the image, about a third of the way in. Points 3, 2 and 5 are actually the fourth, third and sixth going clockwise from lower left, so this first triangle defined in the code is the one at the left top of the firebox end, wth its bottom horizontal and its long diagonal face sloping down to the right.

Image


PS: Personally, I'm only interested in modelling steam locos. These also happen to be the most complex ones. Serves me right. :-P

Anyway, even the most complex ones can be deciphered. I nailed down the function of every point on the H10/Berkshire body mesh in one long day. Many of the diesel and electric locos have only one half to one third of the number of points in a steam loco. If someone wants to play with diesel or electric loco models, and assuming they are not using one of the rare exceptions that is as complex as a steam loco, then I think it is fair to say that they could not only nail down the function of every point on the mesh in one day, but also sort a guide to where every triangle maps to the DDS/TGA image.

In other words, if you're a diesel or electric fan don't be scared of this stuff. You should be able to get yourself a complete guide to a loco, including screenshots and notes, with one hard day of work. Once you have that, you will be able to mainpulate it in any way that you like.

Since I'm stupid enough to only want steam locos, it's probably more like three days for a complete, idiot-proof guide to one loco (assuming that people will refrain from building better idiots).

If someone does make such a guide, it'd be nice to post it for everyone else. I'll be sorting one out for the H10/Berkshire. (0!!0)
User avatar
Gumboots
CEO
Posts: 4813
Joined: Mon Aug 13, 2012 4:32 am
Location: Australia

Re: Re-skinning for beginners (that's me) Unread post

Hmm. Maybe I wont, or at least not in a hurry.

After going through the H10/Berkshire file I have most of the points nailed down for function. However, when I got to the end I noticed my tally was slightly off. Instead of the 827 points the file claims it had, I had totalled up 822. So, five point discrepancy. Awesome. :-P

There is currently good news and bad news. The good news is that the five point discrepancy appears to be fairly early in the file. I simply missed recording five points somewhere. That means that a lot of the stuff I have recorded is accurate if I simply take the point numbering and add five to it. IOW, I have the vast majority of the points fully documented, and they can easily be found in both the points declarations and the triangle declarations.

The bad news is that there are a few which are really nasty to track down, and of course they are useful ones that people are likely to want to change. One such point is the right rear bottom corner of the cab. There are actually two points there, sitting on top of each other. One is grouped with the rest of the cab points and is mapped. The other is hiding somewhere in the hex. Where? Dunno yet. :mrgreen:

What this means is that if you want to move the cab around it's easy....................................except for that one corner, which will mess you right up. At this stage I was fairly sure that traps like this had been built in on purpose. There just didn't appear to be any other explanation for the way some of the points and triangles are arranged.

OTOH, I had only tried the one file, so perhaps this was just an odd one. I figured it may be worth checking some of the other loco bodies. I looked around a bit, and the simplest steam loco bodies are the Mallard (371 points) and the Class A1 (392 points), followed by the Duke (492 points). Any of these would be a lot less work to map than the 827 points in the H10/Berkshire file. So I opened up the Class A1 file and starting juggling points around.

It turns out that even though it is a lot simpler than the H10 file, the Class A1 file still has points ordered all over the place. It would be possible to doucment it all, and it would be about half the work required to document the H10, but at the moment I really cannot be bothered. After putting in quite a bit of time over the last few days, I am now sure that building locos from scratch is going to be faster, easier, and infinitely more enjoyable than trying to reverse engineer the crud that PopTop inflicted on us.

Even if I do move something around it would still have the image mapping of the original, which means blurry gfx close up and smokeboxes that look like they are built out of bricks. I'm kinda over all that. It's not worth trying to fix it for the old locos, IMO. I'm going back to building a new Garratt. !*th_up*!

If anyone wants to take a look at the stuff for the H10, just ask.

==================================

Anyway, regarding building new Garratts and making things easy to find in the code, I thought about the idea of set markers that I mentioned in the Australian steam locos thread.

What is wanted for set markers in the points declarations is something that gives an easily recognised/searchable block of code, but doesn't give daft coordinates since the game engine will have to map them in real time. Check the screenshot:
Set_markers_hex.png
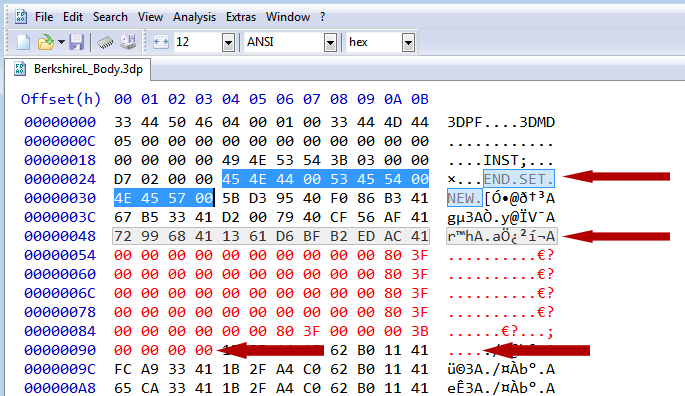
Set_markers_hex.png (16.98 KiB) Viewed 8802 times
The example file starts with the standard file header up to INST, then the declarations for number of points and triangles (just make those whatever works). After that is the proposed set marker, highlighted in blue. This is simply another point, with coordinates chosen to be very close to zero for x,y and z axes. IOW, it will sit in the middle of the loco at track height. This can be repeated as many times as necessary, since there is no prohibition on different points being at the same location in space. Each use of it will have to be tallied in the total count of points, but that's no problem.

The result will be a clear marker at the end of every group of points. All the boiler stuff can be grouped together, with END.SET.NEW. after it. The cab stuff (or whatever) can then follow, and would obviously have END.SET.NEW. at the end of it too. There probably wouldn't be more than ten marker points in any file. This should make finding bunches of stuff to juggle a lot easier, and should have no ill effects during gameplay. (0!!0)

After that, highlighted in grey and red, is an example for a marker to be used in the triangle mapping. The row highlighted in grey would just be the relevant point numbers, as usual for triangles. These wont be a problem. The first three rows of the stuff in red define the normal vectors for each point, and can just be set to pointing straight up for all points (which is what the 00 00 0080 3F at the end of each line means).

The next two rows define the mapping to the image, and for a 512x512 image mark out a triangle from top left (0,0) to top right (512,0) then right and one pixel down from the top (512,1). IOW, all that would be needed would be to leave a one pixel high transparent strip across the top of the image (or 2px in the case of a 1024x1024). Since the marker points will map to that area, you wont see anything in the game. The block of code should be easy to search for, since it's highly unlikely that any other part of the file apart from markers will use that exact sequence.

This means that is should be possible to find stuff without going bonkers. ::!**!
User avatar
Gumboots
CEO
Posts: 4813
Joined: Mon Aug 13, 2012 4:32 am
Location: Australia

Re: Re-skinning for beginners (that's me) Unread post

Ok, so after all that grumbling I tried something else. Defeated I shall not be. :-P

This time I started with a default PopTop H10 file extracted straight from the 3DPF pack, instead of playing with the existing Berkshire file. This seems to be a bit better, so maybe the Berkshire file was a bit messed with before, or I just knackered something myself. Whatever.

Anyway, by referring to my notes and playing around for a few hours, I managed to turn the H10 body .3dp into a pretty good facsimile of a Class A1 Berkshire. It's got the extended firebox and the hump in the boiler profile, and I changed the cab to match a proper A1 cab. All it really needs now is a new rear truck and bogies, which should be easy enough. No idea how it'll look in the game yet, but since it's calling most of the default mapping it should be pretty good. Minor tweaks to graphics are to be expected. (0!!0)
prototype_a1_1.png
prototype_a1_1.png (66.01 KiB) Viewed 8790 times
prototype_a1_2.png
prototype_a1_2.png (60.08 KiB) Viewed 8790 times

Oh and I had an idea about the infamous alpha night glow problem. It's so simple I'm kicking myself for not thinking of it before. The thing is that wth fairly simple modifications of a default loco, you can use the default alpha channel. All that's needed is to extract the DDS pack that comes with the game. That contains all the skins, in all the required sizes, with alpha channel included. They can be exported as .tga for working on them (recolouring, etc) and there should be hardly any need to touch the alpha channel. Will have to try it and see how it goes.

The other good thing about extracting the DDS pack and saving to .tga is that you get bigger skins of better quality. The .tga provided in the user skinning tools is only 512x512. The A skin DDS is 1024x1024 for most locos. That means four times the pixel count, which means much better graphics in the game. !*th_up*!
User avatar
Gumboots
CEO
Posts: 4813
Joined: Mon Aug 13, 2012 4:32 am
Location: Australia

Re: Re-skinning for beginners (that's me) Unread post

This is coming along well now. I got into detailing a bit more, as the default H10 includes some bits that weren't ever on an A1 Berkshire. Come to think of it, I can't see them in any picture of a standard light or heavy Mikado either. Dunno where the game devs got them from.

Anyway, just as an exercise to try out some actual code manipulation, I moved the unwanted bits around and revamped their geometry, without creating any new points or breaking any of the existing triangles, to make them into things that should be on an A1. For instance, the extra long tank under the walkway on the left side was made out of the large step/platform that used to be there. This will mean rejigging the .tga image and the triangle mapping a bit in a couple of places, but nothing too drastic.

I still have a couple of bits left over, which I already have plans for, and I'm still going to tuck the feedwater pipes into the smokebox just above handrail height, since that was how they were arranged IRL. Two of the bits I still have to play with will be used to bevel off the vertical corners of the sandbox a bit, which will make it look a lot better. The other bits will be used to box up the safety valve above the firebox. After that it really will be finished as far as body work goes, then it'll be onto making a new rear truck. !*th_up*!
prototype_a1_3.png
prototype_a1_3.png (55.22 KiB) Viewed 7838 times
prototype_a1_4.png
prototype_a1_4.png (53.04 KiB) Viewed 7838 times
LLW_A1-72dpi.JPG
LLW_A1-72dpi.JPG (83.51 KiB) Viewed 7846 times
User avatar
Gumboots
CEO
Posts: 4813
Joined: Mon Aug 13, 2012 4:32 am
Location: Australia

Re: Re-skinning for beginners (that's me) Unread post

::!**! It's done. Well, as far as the basic body coding goes anyway. I think this is about as far as it's reasonable to go. All points and triangles of the original are still used, and no new ones have been created. Without making a whole lot of new ones, there's not much more that can reasonably be done on a base of the default PopTop H10 geometry. Looks ok, IMO.

This file editing stuff is bad sometimes, and not so bad other times. If anyone else gets inspired to have a first go at it, I have some suggestions.

Document everything as much as you can, and keep the notes handy. Also, make sure you understand the geometry before you start randomly moving stuff around. If you don't, it's easy to get lost. Remembering your high school trig will help a lot. Speaking of which, make sure you have a good calculator sitting next to you too. Have a backup copy of the file, saved after each successful edit, and keep that handy too. Take things in small steps and check the result frequently. Take a break when it starts driving you crazy. :mrgreen:

Having said all of that, it is rather satisfying when you work something out on paper, then watch it all snap into place in the 3dp viewer. So it's not all bad. !*th_up*!

Next step will be the rear truck, then some basic in-game testing before doing the final gfx and whatever else it needs (it's sure to need something).
complete_a1_1.png
complete_a1_1.png (63.61 KiB) Viewed 7827 times
complete_a1_2.png
complete_a1_2.png (55.29 KiB) Viewed 7827 times
complete_a1_3.png
complete_a1_3.png (51.77 KiB) Viewed 7827 times
User avatar
Gumboots
CEO
Posts: 4813
Joined: Mon Aug 13, 2012 4:32 am
Location: Australia

Re: Re-skinning for beginners (that's me) Unread post

Further thoughts have been thought. It happens. :-D

After looking at the default H10 in the game last night I realised I had made an error. I'd assumed that the three narrow triangles down low each side, roughly in the location of the drivers, were for components that were on the same line as the axle. Turns out they're for graphics for the brake blocks, and therefore sit between the drivers. That means I have the firebox/ashpan length slightly wrong and will need to move the front of those forward a bit. This also means moving the sand box and steam dome forward, and while I'm at it I might as well move the dome shut-off valve from the right side of the steam dome to the rear face, which is where it belongs on a Berkshire (I got lazy yesterday and just left it where PopTop had put it).

Fortunately, compared to what has gone before, these are very simple and straightforward changes, so shouldn't take long.

Other thoughts are:

I want a better hex editor. HxDen is basically ok, and the file compare function is very handy, but although you can bookmark lines of code it loses the bookmark whenever you save the file. Now, you might reckon that the whole point of having a bookmark function is so that the #$@!^ editor will @%$&@ keep track of your @%@%! location in the !%@$# file. All the @%@$! time. Apparently, the maker of HxDen thought this was not the point of bookmarks. I have no idea why.

Also, although HxDen claims to have "unlimited undo" this only applies until you save the file. At that point, all your history is lost and you can no longer undo edits by tracking back up the history. Quite frankly these two flaws are, IMO, idiotic in a code editor. I'm used to using code editors that track things the way they should. Unfortunately, the ones I'm used to wont handle hex editing, so I'll have to look around a bit.

IMO, what a hex editor needs are the following atrributes.

1/ Will bookmark lines or blocks of code, and keep the bookmarks permanently.
2/ If you close the app without closing the file first, when you reopen the app it will still have the file you had open before, bookmarks and all. Really, this is basic functionality for a code editor.
3/ Keeps the edit history even after saving a file, so you can easily reverse edits if they didn't work. Again, basic.
4/ To make things easier for decimally-minded humans, has the ability to number lines in decimal rather than in hexadecimal.
5/ Ability to set number of columns.
6/ Ability to compare two files side by side.
7/ If you could type in numbers in plain English and have them automatically converted to Indecipherable Martian that would be handy (not a deal breaker if it doesn't have it).
8/ Even more cool if it will do them back the other way, so you can open the file and immediately know what all the hex means in normal 3D coordinates. IOW, basically the ability to display a hex file in basic decimal. This is not essential, but would be very nice.

HxDen has 4/, 5/, and 6/, but lacks the others. I believe Tiny Hexer has 5/ and 7/ (haven't tried it yet) but lacks the rest. Will take a look at it and seee how it performs. Will also check around to see what else is available.


Next thought is: If attempting reverse engineering of any more PopTop models, use a CAD app. Transferring the coordinates you're working on to a basic 3D CAD app would make manipulating the geometry much easier, IMO. Once they are sorted, transferring the new numbers back to the hex should be all that is required.

It'd be a bit tedious to grab the numbers from the hex, convert them to standard decimal, then enter them into the CAD app as points/faces, etc. However, given that with this stuff you'll spend half your time trying to figure out what does what, an easily comprehensible format is what is needed for trying out changes. That means being able to use numbers that make sense to you, and being able to change them easily. This means CAD app. !*th_up*!

For instance, if I'd done this earlier I would have already known about the exact location of the drivers relative to the firebox. I already had the drivers set up in a basic CAD file, from when I was checking out wheels when I first looked into .3dp files, so I should have built on that for the locations of other components. Will do that in future. (0!!0)
User avatar
Altoona+BeachCreek
Conductor
Posts: 211
Joined: Wed Jun 27, 2012 8:44 pm
Location: Altoona, PA-Former PRR Shops!

Re: Re-skinning for beginners (that's me) Unread post

Gee mah, think I'll get a dictionary fer xMas so I can understand what the grown up said?? ^**lylgh
I'm glad there are people like you here who know what you're doing! Keep up the good work!
"Train roll on, on down the line. Take me many miles from my home."
User avatar
Gumboots
CEO
Posts: 4813
Joined: Mon Aug 13, 2012 4:32 am
Location: Australia

Re: Re-skinning for beginners (that's me) Unread post

Well fortunately some smart cookies (Bomber, Ned, WPandP, and others) did a lot of the ground work a while back, so if you read what they wrote it will get you off to a good start.

This thread is sort of half stream of consciousness ranting. Like I said to Wolverine, I'm just noting stuff as I go, and if it's all written down then it can be cleaned up later, after which it might make sense to other people and therefore be useful. :mrgreen:

Anyway, I've been looking at hex editors and have found one which has totally awesome bookmarking functionality. This means the whole hex file can be effectively documented, and easily searched.

For instance, it is possible to create different bookmark groups for a file, so you could have a group for each component of the loco body (like firebox, for example) that would have nice jump-to links for declarations for the points and the gfx triangles for that component. this would make things far less brain-frazzling. Only catch is that to get that functionality I'd have to get a paid version, but only the most basic paid version (which is quite cheap). If I get it, I'll probably find non-RRT3 uses for it too. Given how much aggrevation it'll save, I'm seriously considering forgoing a dozen beers and just getting it.
User avatar
Wolverine@MSU
CEO
Posts: 1166
Joined: Fri Nov 10, 2006 2:14 pm
Location: East Lansing, MI

Re: Re-skinning for beginners (that's me) Unread post

Gumboots wrote:Given how much aggrevation it'll save, I'm seriously considering forgoing a dozen beers and just getting it.
I thought you were only 15 years old - if so are you allowed to drink beer? On the Hex Editor stage, I have used HxD, but have only limited experience and don't know if it has all the bells and whistles you need.
User avatar
Gumboots
CEO
Posts: 4813
Joined: Mon Aug 13, 2012 4:32 am
Location: Australia

Re: Re-skinning for beginners (that's me) Unread post

Well, if you mean "were only 15" as in past tense, you would be correct. At one stage, I was indeed 15. However, this was well over three decades ago, with the result that currently I am allowed to drink as much beer as I like. (0!!0)

HxD was the one I was using, and it's what got me looking for something better. ;-) I wanted something that was still being actively developed, was free or cheap, and was not short on desirable features. This stuff is enough work already without making it harder on myself. What is really needed for reverse engineering default files is, IMO, a really good bookmarking system. I've decided to go with Hex Editor Neo (Standard version). This is a good compromise (for me) between features and cost. At the moment I can pick it up for 20 bucks, and it has already saved me 20 bux worth of aggro.

What it allows is an unlimited number of permanent bookmarks, grouped or ungrouped. These can be bookmarked individual bytes or complete blocks of code. They can be given individual text descriptions and colour coding of your choice, can be shown or hidden with one click, and have a record of how many bytes they contain so you can easily cross-check for errors in your highlighting. Obviously, you can jump to any bookmark, or group, or toggle through them.

All that is now required map a file is to do the z-index trick of making the points heights negative (change 40 to C0, or 3F to BF, straight down one column) and checking in 3D Object Converter to see when you have a complete component. Then just highlight that entire block of code, make a new bookmark group that has a description and is colour coded differently to the previous group, and click "Selection to group". Voila! You now have a permanent record of what those points do, and you can easily see in the code exactly which bytes are relevant.

This is totally awesome, because it means mapping every point in a .3dp suddenly becomes a lot quicker and easier. I set up complete bookmarks for all points in the H10 2-8-2 L_Body.3dp and the A1 2-4-2 L_body.3dp in a few hours after dinner last night. Not only that, but when I go back to some section of a file I don't have to go cross-eyed finding the exact bytes I want. They all have a nice background and outline. It's a lot easier on the brain and eyes, compared to more basic editors. !*th_up*!
Example_display.png
Example_display.png (171.8 KiB) Viewed 8376 times
User avatar
Wolverine@MSU
CEO
Posts: 1166
Joined: Fri Nov 10, 2006 2:14 pm
Location: East Lansing, MI

Re: Re-skinning for beginners (that's me) Unread post

Gumboots wrote:Well, if you mean "were only 15" as in past tense, you would be correct. At one stage, I was indeed 15. However, this was well over three decades ago, with the result that currently I am allowed to drink as much beer as I like. (0!!0)
Crikey!!! I guess I got you mixed up with someone else on the Forums........Drink away......and remember......."Fostahs - it's Australian for Beeah"

Keep up the good work. !$th_u$!
User avatar
Gumboots
CEO
Posts: 4813
Joined: Mon Aug 13, 2012 4:32 am
Location: Australia

Re: Re-skinning for beginners (that's me) Unread post

Foster's isn't that good. Try Cooper's or Boag's. !*th_up*!

Anyway I took the default rear truck for the H10 and edited it into a shape that should work for an A1 Berkshire. Resized and repositioned the existing rear wheels for the second truck, and made the extra two that were needed. The other tweaks (firebox sizing, etc) are done too, so it's basically ready for packing and in game testing. It will still need work on the gfx, but I can test the geometry now and get an idea of what else it will need. I may have to tweak length points, and attachment points for track and trucks. I'm pretty sure some of the normals for the skin triangles will need adjusting too, just to get the game engine to shade some of the modified surfaces nicely. However, the main structure is fine.

Also, after grumbing about the game's authors nobbling files to make them harder to reverse engineer, I've discovered that some of them are really clean. I took a quick look at several of them, and stopped playing with the ones that were all mixed up. The 242 A1 (the French 4-8-4 in Whyte notation) and the Atlantic are really nicely laid out though, and were a piece of cake to map. They break down really cleanly into all their separate components, so there's a lot of scope for doing things with them.

The other A1 (Yellow Flying Yorkshire Pudding 4-6-2) was interesting. It has a low vertex count but is a real mongrel to work with. I'd advise anyone to steer clear of attempting serious customising of that one. The way it's laid out is not user-friendly because everything is tied together and the points are in a weird order (or lack of it). Trying to move stuff around on that model is likely to drive anyone nuts.

Some of the others are just a horrendous mess (like the Northern 4-8-4) but I no longer think it was deliberate. It was probably just some dev winging it as they went and changing their mind all the time. Since they would have been using an app that made deleting and inserting vertices easy, it wouldn't have bothered them too much. Real nuisance for us though.

My 2c is mod the ones that are easy to work with and basically ignore the others. For something like the yellow 4-6-2 A1 it would be better to just build from scratch, unless you only wanted really basic tweaks.
User avatar
Altoona+BeachCreek
Conductor
Posts: 211
Joined: Wed Jun 27, 2012 8:44 pm
Location: Altoona, PA-Former PRR Shops!

Re: Re-skinning for beginners (that's me) Unread post

On the A1 Pacific: Haven't you seen the skin for that one? It's a beautiful green livery complete with LNER tender and "Royal Coachmen" on the center axle streamlining. It's rather clean and crisp IMO. I definitely would never use the Yellow livery.
"Train roll on, on down the line. Take me many miles from my home."
User avatar
Gumboots
CEO
Posts: 4813
Joined: Mon Aug 13, 2012 4:32 am
Location: Australia

Re: Re-skinning for beginners (that's me) Unread post

That skin was never upoaded to this site, so there's no way of using it unless you want to make it again from scratch. I agree it is an exceptionally nice skin. It probably wouldn't be that hard to re-create it, but unfortunately the only images provided for the A1 are 512x512, which is B skin size for most locos. To get a better resolution, it would be better to make a new image at 1024x1024 for the new A skin.

Anyway, skinning isn't what I was thinking of since it doesn't involve moving stuff around. This thread has gone a bit off topic. Instead of being about basic reskinnning for beginners, it's sort of morphed into "Basic hex editing, obscure mathematical formats, file structures of stuff written backwards by weirdos, three dimensional geometry (Cartesian only, fortunately), three dimensional trigonometry (but thankfully not spherical trig), and sundry other stuff............for beginners". :mrgreen:'

Oh and that editor has a built-in converter for IEEE754/hex to normal decimal numbers, which is handy for figuring out which points are where in space. The great advantage of it over the other (online) one I found is that it accepts the hex straight from the .3dp file, with no need to swap the bytes around to get the right order. No need to remove spaces between bytes either. Just copy/paste the string of four bytes straight from the file, and you get a number you can understand. Works back the other way too. If you have a value of 12 and you want to move the point to 10, just type or paste 10 into the base converter and it gives you an answer in ass backwards Martian. ::!**!

This is a lot less strain on the brain. !*th_up*!
User avatar
Gumboots
CEO
Posts: 4813
Joined: Mon Aug 13, 2012 4:32 am
Location: Australia

Re: Re-skinning for beginners (that's me) Unread post

I've been doing a bit of studying up on how graphics work in the game. This is mainly to get a handle on how the normals should be used to get corect shading of surfaces.

It turns out that DirectX uses a basic Cartesian co-ordinate system, which is a relief, and the normal vectors all have to have a length of one unit. This is cool, because it makes things easy (relatively) to calculate. I had thought I might have to brush up on vector additions and stuff, a lot of which I haven't used for years, but for what's required in RRT3 it turns out to be rather simple.

For the vast majority of curved surfaces in the game, the geometry will be either a cylinder or a section of a cylinder (boilers, cab roof, etc) or a partial sphere (top of steam dome, etc). That means all vertex normals just radiate from the centre, and have an angle that splits the difference between all adjacent faces in three dimensions. If you're one of the people who hated trig in high school this probably sounds terrible, but really it's not that bad at all.

There is some anomalies though (isn't there always) but they are related to simpler shapes, not more complex ones. IOW, it's also easy to sort out. The game engine uses what is known as Gouraud shading to cheat the look of curved surfaces from a series of triangular facets. This is fine on a boiler, but not so good on a cab. A cab is actually rectilinear in most cases, so to get it shaded correctly you do not want to apply an algorithm that assumes a curved surface around the corners.

You can see this anomaly at work on the edges of the walkway along the boiler in the screenshot, and also on the face of the steam dome. The algorithm is assuming a constantly curving surface and trying to shade it accordingly.
shading_1.png
shading_1.png (37.09 KiB) Viewed 8162 times

The other thing is that the way vertex normals are calculated can give an incorrect result if the surface is cut off, because it relies on averaging the triangles adjacent to the vertex. If the surface is cut off (ie: hemisphere floating in space) then on one side of the cut line there will be no more faces, which will bias the averaging of the face normals, which can result in an incorrect vertex normal. What will happen is that the curvature will appear to decrease at the limit of the surface, instead of remaining at the correct value. I've already seen examples of these sorts of thing in the hex code for the H10 loco body.

After doing a bit of digging, I found out that it's not hard to fix these. To get a clean line between faces of a rectilinear shape (like the sides of a cab) what is needed is to use two vertices for each point, so that each vertex can have a normal pointing in a different direction. IOW, the best way to model something like a cab is with each side as a completely seperate unit that has its own vertices, and does not share any vertices with the other sides of the cab. This is not the way the orignal PopTop devs did it, presumably because they were trying to save vertices, but it's a recognised technique for working with DirectX graphics.

To get correctly calculated normals on a truncated curved surface, all that's required is to assume that the surface continues past that point and work out the last normals on that basis.

Short version: by applying some basic trig it should be possible to get better shading than the default models, without frying the brain. (0!!0)
User avatar
Altoona+BeachCreek
Conductor
Posts: 211
Joined: Wed Jun 27, 2012 8:44 pm
Location: Altoona, PA-Former PRR Shops!

Re: Re-skinning for beginners (that's me) Unread post

Hey, I was re-reading through here for some tips on reskinning, and I see it escalated into what you called it a few posts back pretty quickly :lol: What I want to know is, you were using photoshop for those three Northern skins, right? If so, have you ever used GIMP software? Would you know how to do a hue change using that program? I understand what you're talking about by changing the hue of a certain color so as not to affect the details and get a cartoon, but I can't find anything that seems to be able to do that in the list of tools in GIMP. Also, if you don't think GIMP is good for this kind of thing, what program would you recommend (preferably free ones)? GIMP seems good for where details don't really matter, like renumbering locomotives and apllying decals like this: http://www.youtube.com/watch?v=t-WGniTapL4 I don't see much potential for serious skinning by this program outside decals and the like, unless you know something I don't. Which, you almost certainly will.

Edit: I've sort offigured it out. There is a tool to select an area based on color, then it boxes it in for you, and from here you can fill that area in. I'm going to do some testing and upload some screens. Don't bother (yet, anyway) trying to figure out how to do what you did on PS on GIMP, because this might be a worthy replacement method.
Second edit: Here's what I've accomplished with a minimal amount of effort so far.
Third edit: I can't yet find it in the skin scroller in RRT3, so I'll do an obvious edit to the profile and see if it comes up then.
Fourth edit: While converting these files using the handy-dandy TrainSkin convertor, I got an idea. What if I told it to use another engine's tender skin? We'll find out, folks, in a few minutes...

Same problem, temp removal
Last edited by Altoona+BeachCreek on Tue Sep 10, 2013 6:19 pm, edited 1 time in total.
"Train roll on, on down the line. Take me many miles from my home."
User avatar
Altoona+BeachCreek
Conductor
Posts: 211
Joined: Wed Jun 27, 2012 8:44 pm
Location: Altoona, PA-Former PRR Shops!

Re: Re-skinning for beginners (that's me) Unread post

Results:
(And I apologize for making you download everything, but the attachment process won't let me upload them directly. "It was not possible to determine the dimensions of the image.")
As you can see, the skin for the Northern got all screwed up... What in the world went wrong?? I followed the directions exactly the way I was told by the TrainSkin convertor included in the game files, but this still happened. And don't worry about the tender issue, that was just for laughs :-P When you folks convert skins, what process do you do? Might it be easier if I just made it into a .pk4 file and did it that way? If so, how do I do that? In a few minutes, though, I may have to get off. I can still access the site form my mobile device, but won't be able to do any testing. We'll see.

File was large and messed up, removed temporarily
Last edited by Altoona+BeachCreek on Tue Sep 10, 2013 6:18 pm, edited 1 time in total.
"Train roll on, on down the line. Take me many miles from my home."
User avatar
Gumboots
CEO
Posts: 4813
Joined: Mon Aug 13, 2012 4:32 am
Location: Australia

Re: Re-skinning for beginners (that's me) Unread post

GIMP will do most things that PS will do. It's generally less intuitive to work with, but has some advantages for some purposes.

IIRC, what I did was to crop out the sections I wanted colour change on and split those to seperate layers. I do the cropping at fairly high magnification, because it's easier to get accurate results that way.

This tends to give cleaner results around the edges than just selecting by colour and filling. Also, you don't run the risk of accidentally selecting other areas that share the same colour.

Anyway, these new layers sit above the first one, and the hue change layer sits at the top. This method means that the bits you don't want to change are affected by the hue change layer, but you can cheat. The way to cheat is to put another hue change layer just above the lowest layer, and use an inverse hue change to the other one. This negates the effect of the upper hue change, with the result that your lowest layer keeps its original hues.
Post Reply