Southern Railways "Schools" V class [WIP]

Creating and Editing Rollingstock
User avatar
Gumboots
CEO
Posts: 4813
Joined: Mon Aug 13, 2012 4:32 am
Location: Australia

Re: Southern Railways "Schools" V class [WIP] Unread post

Hey I just got around to testing that export script with a basic cube mesh from Blender, already UV mapped to an image. Yup, it exports .3dp's. :mrgreen:

There's still a slight catch in that it is currently exporting face normals rather than vertex normals, but I'm sure that will be easy to fix. Everything else seems ok. Vert coordinates are correct, UV mapping is correct, vert and tri counts are correct, etc.

It'll need a bit more tweaking, but it's looking like a winner.
User avatar
Gumboots
CEO
Posts: 4813
Joined: Mon Aug 13, 2012 4:32 am
Location: Australia

Re: Southern Railways "Schools" V class [WIP] Unread post

Ok, so since I now have a basic export script, and since it exports UV mapping (in fact it won't export without UV mapping) I've made a start on skinning this beast. Have got a basic WIP skin on the cab, boiler, smokebox, funnel, steam dome, whistle base, cylinders, wheel arches, wheels and smoke deflectors.

I'll skin a few more bits as well so I have something that will look like a basic locomotive for export testing, then delete the unskinned parts so they don't crash the script (obviously I'll be saving the file with all the bits first).

Anyway, it's progress. !*th_up*!
Skinning_1.jpg
Skinning_1.jpg (45 KiB) Viewed 12715 times
Skinning_2.jpg
Skinning_2.jpg (29.02 KiB) Viewed 12715 times
I'm liking the 24 sided boiler. Once reason I wanted it was so that livery that had the boiler banding accented by striping, like a lot of locos had, wouldn't look too angular. It works pretty well. If you wanted to get really fussy about it a 36 sided boiler would be even better at close range, but I think 24 is a reasonable choice. It'll reduce to 8 sided on the lowest LOD anyway.
User avatar
Gumboots
CEO
Posts: 4813
Joined: Mon Aug 13, 2012 4:32 am
Location: Australia

Re: Southern Railways "Schools" V class [WIP] Unread post

!!party*! Yeeeeeeeeeeeeeee HA! !!party*!

It works! It @^#&@%&##%$!&$ works! ::!**! (0!!0)

I just got around to testing this export script with a live in-game model. At the moment it is stripped down, since I hadn't done the graphics mapping for all components. I just wanted to see if it really would work. So, no tender, and half the loco's bits and pieces are missing. The skin is also a lot darker and flatter under RT3's lighting than it is in Blender, so obviously the texturing is going to need some work there too. That's not a big deal anyway. It's just a matter of lightening things up a bit and adding some shading to the skin image itself to give a more 3d effect in places. Also need a bit of noise/dirt/gloss/whatever (but not too much) to make it look less CGI and a bit more real.

However...

...it @^#&@%&##%$!&$ works! ::!**! (0!!0)

Yes, the first ever completely-built-from-scratch-in-Blender-and-exported-to-RT3 model is a reality. From now on there is no need to pig around in the depths of hex files if you want to do some modelling. !*th_up*!

Screenshots attached. Stats are provisional, but close to what the final stats will be.

The idea is to price the thing at a normal/moderate level for express locos of the period as far as purchase cost goes. I may still increase the price slightly, but they were fairly simple locomotives and not very large.

Maintenance cost is deliberately a bit on the low side. Given RT3's hard coding escalation of annual maintenance costs, the only way of making a reliable loco economical to run over the long term is to reduce the initial maintenance cost. This may need some more balancing against other factors.

Acceleration is only "above average" since these locos were a bit tricky from a standing start, due to having more power than their adhesion could comfortably handle. Reliability rating is "very good", since they were bulletproof and would run like clockwork for years. Passenger appeal is a reasonable "looks sharp", since in this era "ultra cool" should be reserved for streamliners.

Fuel economy has been set to "good" as this class was known for being free steaming even on crappy coal, and easy on the fireman. Footplate crews loved the things.

Top speed is what they actually would do: 95 mph. This will be achievable with a very light load on the flat, given sufficient distance, or how one of them did it in real life: hauling a four car consist on a slight downhill grade. Since these things were built for hauling moderate weight express consists over some quite demanding grades, I've kept the uphill performance to a useful level. I may still drop pulling power slightly.

So, at the moment it is unfinished and frankly a bit rough, but it's running. If anyone would like to try it out, just let me know.
Yay_it_works.jpg
Yay_it_works.jpg (101.87 KiB) Viewed 12696 times
Trial_statistics.jpg
Trial_statistics.jpg (76.76 KiB) Viewed 12696 times
User avatar
Gumboots
CEO
Posts: 4813
Joined: Mon Aug 13, 2012 4:32 am
Location: Australia

Re: Southern Railways "Schools" V class [WIP] Unread post

I was just playing around with the basics of trying to fake valve gear, and found out something interesting. I started with the default Beuth as a test model, since that has two conrods (the normal one forward, plus one to the rear ) on each side, running off the same crankpin. I figured this was a quick and easy one to mess with for basic principles.

Ok, so by default all locos are coded so that the connecting rod big end is vertically below the drivewheel axle. I just tried changing one of them so it was directly above. This broke things big time but everything still rotated in synch, so I started looking closely at how it was broken. Figured it out. It turns out that if you flip the big end attachment point to above the drivewheel axle this is fine, except that the connecting rod graphics will be rotated 180 degrees around the big end. IOW, instead of pointing forwards and down, which you'd expect, it's pointing backwards and down even though the conrod graphics coordinates are still set for it pointing forwards and down. The graphics then oscillate on a line following the piston (that bit is normal).

Ok, so what does this mean? It means that if the graphics coordinates for the conrod are set so they are flipped front to rear around the big end, compared to what they "should" be, it should all work normally. This is, in itself, not that useful, although it could be used to put the front and rear drivetrains of a duplex loco or a Garratt 180 degrees out of phase just to make them look a bit better.

The interesting bit now is what will happen if I put one of the crankpins at some intermediate angle? 90 degrees is the obvious one to try, since that would allow us to build RT3 locos that have a properly quartered drivetrain. If it's just a matter of doing some weird, but fairly simple, 2D geometric translation on the conrod graphics to account for the custom crankpin angle then this shouldn't be a drama. It may also allow the crankpins of 3 cylinder locos to be set at the correct 120 degrees.

The one that really interests me at the moment though is that it may be possible to also set up the driving arm for Walschaert's gear at the correct angle to the main crankpin, which would be rather cool. Will have to mess around with it and see what happens. !*th_up*!

Edit: Just looked up details for Walschaert's gear and it runs out the valve arm trails the crankpin by 90 degrees anyway, so if I can get 90 degree crankpin offset sorted we can have quartered drivetrains and basic fake valve gear. !*th_up*!
User avatar
Gumboots
CEO
Posts: 4813
Joined: Mon Aug 13, 2012 4:32 am
Location: Australia

Re: Southern Railways "Schools" V class [WIP] Unread post

::!**! Has now got a better skin and (this is the good bit) smooth shading over the body mesh! :mrgreen:

I'm looking at doing three skins for it, which will all be part of the release pack when the thing is finished. These will be the original Southern Railway olive green, the later SR malachite green, and the British Rail mid Brunswick green that was carried in later years. The skins are easy to do, and there are three surviving members of the class, so I figure do them up with their right names and numbers on them, in three different paint jobs they would have carried over their careers.

Of course, the problem is that everyone has a different opinion on exactly what shades of green all these colours were, so I'm just going to take a good average and then fudge it a bit to look good with RT3's lighting. !*th_up*!

Anyway, I'm now at the point where I can see good progress being made. Final version should be ready around the end of the month. Beta testing versions available any time somebody wants one.
Better_skin_1.jpg
Better_skin_1.jpg (74.86 KiB) Viewed 12674 times
Better_skin_2.jpg
Better_skin_2.jpg (78.26 KiB) Viewed 12674 times
JeremyH
Cat
Posts: 4
Joined: Tue Feb 04, 2014 8:41 pm

Re: Southern Railways "Schools" V class [WIP] Unread post

She's gorgeous!
User avatar
Gumboots
CEO
Posts: 4813
Joined: Mon Aug 13, 2012 4:32 am
Location: Australia

Re: Southern Railways "Schools" V class [WIP] Unread post

I have made a bit more progress on this.

Was playing around with the skins last night to get the colour balance right. It's a bit of trial and error, since how it appears in the game is not how it appears in Blender or Photoshop. What I will do at some point is try to make a Blender lighting arrangement that duplicates the look of RT3's lighting. It'd be a useful to have a preset lighting setup as a standard resource for Blender/RT3 shenanigans. Anyone could just grab the stock .blend file for the lighting and use it when working on asset skins on their computer, knowing that when they finally load it into the game it'll look right. This should be possible, and would save some time when working out skins, since checking out the looks in Blender on the fly is faster and easier than constantly swapping files and restarting RT3.

Anyway, haven't got that yet so am still doing things the slower way. Current to-do list is get all the skins hooked up and working properly, with .dsc files, etc, and also get the tender skinning/UV mapping underway so the beast can finally run with the right tender.

Been thinking about colours and have decided against the British Railways livery option. Instead of the BR Brunswick green, which I was never that keen on, I'm going to go with two different greens which were used by Southern. These are both a rich olive green, one of which is very dark (usually called Eastleigh olive) with the other being a fair bit lighter in tone (Ashford olive). I like the dark green a lot, but my initial go at it was too dark for RT3's lighting, so I'm going to start with Eastleigh olive and give it the minimum of adjustment in tone, so it just looks definitely olive green rather than almost black in the game.

The third skin will still be the famous Bulleid malachite, which is a good looking colour that several of the preserved Southern locos get around in.

So then I decided to have a bit of fun with a fourth skin. :mrgreen: A few decades back, one of the UK model train manufacturers did a version of the Schools class that was named Saint Trinian's and painted pink. This was for a bit of fun, since they thought some people took the whole train modelling thing far too seriously. I'm in the mood for a few laughs, so have decided to add a St. Trinian's skin to the pack. This will probably freak the Yanks out but should get some chuckles from the Poms.

The old one by ACE Trains was a bit weak IMO. A St Trin's skin should be hot pink, not washed out pink, and really should have the school's coat of arms (skull and crossbones on a black field) as a badge somewhere. ACE Trains also numbered theirs 1922, which isn't right for the class, and got the spelling of the name wrong. Obviously I'll get the spelling right. I'm thinking of numbering it 999, on the basis that this would be the last in the class's 900 series, and that naming a locomotive after St. Trinian's would be a last resort for a desperate PR department.
User avatar
Gumboots
CEO
Posts: 4813
Joined: Mon Aug 13, 2012 4:32 am
Location: Australia

Re: Southern Railways "Schools" V class [WIP] Unread post

K, so the St. Trin's skin is not going to be pink. Couldn't get a pink one I was happy with, so have decided to take a different tack.

Since ACE Trains just made a wishy washy pink model because they thought a girls' school should have a pink train, I figure I can do what I like. Nobody in their right mind is going to worry about historical accuracy for fictional schools. For those who haven't read Searle's books, the St Trinian's students were sometimes literally murderous. A nice dark colour, with a sense of presence and a hint of blood, is more fitting than a sickly pink.

What I've done is taken one of the 19th century liveries from the London and South West Railway, which was one of the older companies that was amalgamated into Southern in 1923. This is a nice deep sort of crimson/maroon, which is usually listed in articles about LSWR livery as "purple/brown". It totally looks the part.

I'll also be adding another skin which I've already roughed out. This one will be for that fine old school St. Custard's, and will be suitably coloured by taking minor liberties with another old LSWR livery. This covers both of Searle's schools, and should also assuage any BR fans who may be missing their blood and custard, thereby covering Southern history at both ends of the time scale. !*th_up*!

(For those in the US who can make no sense of any of this, don't worry about it. The trains will look good.)

Attached is a shot of the St. Trin's skin at its current stage of progress. Needs more detailing to sort out some rough edges, so don't worry, it will only get better. The same sorting out needs to be done for all skins anyway.

I've also put myself in the position of having to re-map the UV's again, since I've been going through the model and getting ruthless and cunning with vertices and faces. I've knocked off several hundred from the count without any compromise in looks. I'm currently on target to hit the 4000 total without making the thing look rough, which is good, but have let myself in for yet more work, which aint quite so good but will be worth it.
St_Trinians_shot_2.jpg
St_Trinians_shot_2.jpg (78.72 KiB) Viewed 12840 times
Last edited by Gumboots on Sat Jul 11, 2015 7:59 pm, edited 1 time in total.
User avatar
Hawk
The Big Dawg
Posts: 6503
Joined: Fri Nov 10, 2006 10:28 am
Location: North Georgia - USA

Re: Southern Railways "Schools" V class [WIP] Unread post

That look s 'bloody' good. Pun intended. :mrgreen:
Hawk
User avatar
Gumboots
CEO
Posts: 4813
Joined: Mon Aug 13, 2012 4:32 am
Location: Australia

Re: Southern Railways "Schools" V class [WIP] Unread post

Yeah it has a certain something. :mrgreen:

These extra skins are easy to do. I have everything layered in PS, so all I have to do is duplicate a few of the layers (boiler outline, banding, etc) and bucket fill them with whatever colour. All the shading and highlighting is in other layers on top of the basic colour blocks, so I don't have to change any of that.

I'm liking the idea of the extra skins, since they'll be handy for breaking up the roster when running lots of trains. I'll be able to colour code routes for easy recognition. !*th_up*!
User avatar
Gumboots
CEO
Posts: 4813
Joined: Mon Aug 13, 2012 4:32 am
Location: Australia

Re: Southern Railways "Schools" V class [WIP] Unread post

So I just had to upgrade my Photoshop skillz. The nameplates for these little choofers are a bit tricky to make. They have pointed ends, but not at a standard 45/45 degree point. Then they are curved too, just to make it even more fun.

So I did some searching for PS tutorials and found a good trick. It turns out you can draw the usual vector (non-pixellated) shapes in PS and then join shapes together to make your new vector shape.

This works really well. What I did was grab a basic arrow shape that had a 45/45 (90 internal) point on the end, then scale it vertically to widen the internal angle to match the Schools class nameplates. I then drew a basic rectangle to a suitable length of a bit over half the nameplate length, then merged this onto the basic arrow. Took the merged shape, copied it, and flipped the copy horizontally. The flipped copy was then merged onto the first half. All I had to do now was transform>warp it to the right arc percentage (easy) and add a bit of styling (brass coloured stroke, etc). Result: one perfect nameplate blank. (0!!0)

This may seem a bit over the top for an RT3 model, but it's actually quick and easy to do and it gives a great result that can be scaled to any size.

Ok, so now the text. I went through the 200 or so fonts on my box looking for the closest match to the original cast nameplates. Out of what I already had available the best match turned out to be Roboto. This is the default Android mobile font, but funnily enough it just happens to be a pretty close match to the original 1930's Southern Railways nameplate font. It's not an exact match to the original, but you'd have to be really fussy to worry about the difference.This is handy if anyone else ever wants to model something from Southern, since Roboto is a legit free font and readily available. !*th_up*!

It does need some tweaking though. The font has to be used in its bold variant, the height has to be set to 120%, the width to 85%, and the tracking (ie: spacing between letters) has to be set to 300. The size in the example is 46 pt. This is for the main name of the loco.

The smaller text underneath, that just says "Schools class", is still Roboto but has width set to 120% and tracking set to 50 (so the letters are wider and much closer together). The size of the small text in the example is 8 pt. This smaller text will be too small to be legible in the finished skin, but I figured I might as well have an accurate starting point to scale down from since it's not much more work. The frame for the small text was just done with a basic rounded rectangle, which was then warped in an arc and had stroke etc added.

Attached is a screenshot comparing the new made-in-PS test case with the original nameplate from No. 928 "Stowe". I'll have to do another one to tweak the nameplate length slightly, and it needs minor details for the screw heads and bosses, but generally it's pretty good. I don't mind making another one since all the skins will have different names, which means they all need different lengths for their nameplates anyway. Not a big deal, since I have all the basic settings sorted now and will be able to churn them out pretty fast.
Nameplate_custom.jpg
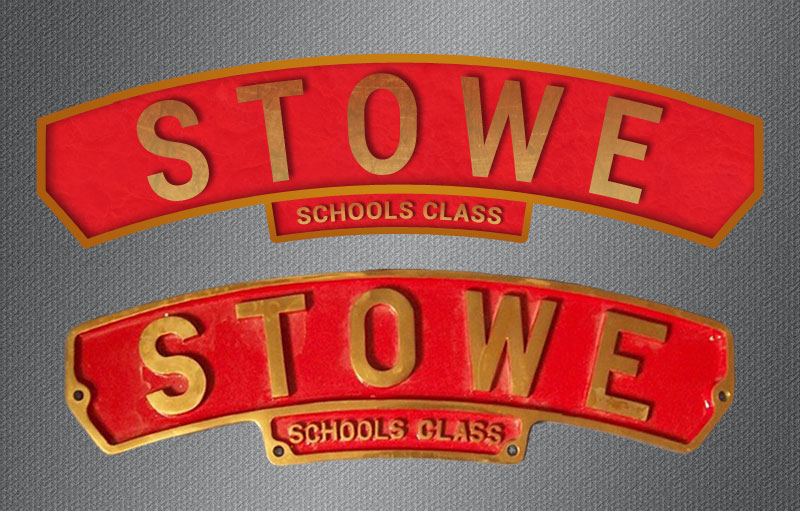
Nameplate_custom.jpg (121 KiB) Viewed 13451 times

Edit: Got the others done too. I ended up cheating a bit. Since I was too lazy to make different length nameplates for every skin, I adjusted the tracking on the three long names to make them fit the one backing plate. I figure nobody is going to mind. If anyone does mind, they can make their own. :-P

"Repton" got its own backing plate though, which is one of the trial ones I made for "Stowe" but was a bit long for that name. So I just cheated the tracking on Repton a bit too, and it fit nicely. Now I can get back to all the other stuff that needs doing.
Other_nameplates.jpg
User avatar
RulerofRails
CEO
Posts: 2061
Joined: Sun Dec 08, 2013 1:26 am

Re: Southern Railways "Schools" V class [WIP] Unread post

Gumboots wrote:I figure nobody is going to mind. If anyone does mind, they can make their own.
Don't mind at all. I would be taking a lot more shortcuts than that. :-) That's quality stuff with great detail that you are doing!
User avatar
Hawk
The Big Dawg
Posts: 6503
Joined: Fri Nov 10, 2006 10:28 am
Location: North Georgia - USA

Re: Southern Railways "Schools" V class [WIP] Unread post

RulerofRails wrote:That's quality stuff with great detail that you are doing!
I agree wholeheartedly. !*th_up*!
Hawk
User avatar
Gumboots
CEO
Posts: 4813
Joined: Mon Aug 13, 2012 4:32 am
Location: Australia

Re: Southern Railways "Schools" V class [WIP] Unread post

I've got all the skins roughed out now. There will be five in total, including three real Southern Railways liveries, with those three locos named after the three surviving members of the class.
Eastleigh_skin.jpg
Eastleigh_skin.jpg (45.79 KiB) Viewed 13418 times
Ashford_skin.jpg
Ashford_skin.jpg (47.42 KiB) Viewed 13418 times
Malachite_skin.jpg
Malachite_skin.jpg (52.16 KiB) Viewed 13418 times

Then there's obviously the deep maroon/purple/brown/whatever St. Trinian's skin, which you've seen already, carrying the old London and South West Railway express livery (plus pirate flag).

The final one is going to be decked out in Stroudley's express livery for the London, Brighton and South Coast Railway (the other major railway that went into forming Southern in 1923). There's a funny story here.

The main yellow/ochre colour for this livery is known as "Stroudley's Improved Engine Green". Hang on, I hear you say, it's not green. Well yeah. The English are a bit eccentric. Anyway, Stroudley's Improved Engine Green is what this colour is called, and there seem to be two main theories as to how it got this name.

The first theory is that old Stroudley was colour blind. :mrgreen: This may be true, but on the other hand the lining and panelling for this livery doesn't seem to fit with that. The complex lining includes red, white, black and a deep olive green, which is not what I would expect from a bloke who was colour blind.

The other theory is that he originally claimed that this new colour was an improvement on the previous green livery, and that what he actually said was that he thought the yellow/ochre was "an improvement on engine green". This then got shortened or corrupted over time, so that people ended up calling it "improved engine green" even though it wasn't green at all, and not even particularly closely related to any shade of anything that anyone has ever called green. Like I said, the Poms are a bit eccentric sometimes.

However, it's quite a good livery and it does have historical value. It does have a sort of custardy hue to it, assuming said custard is baked, as they sometimes are. So, I'm throwing it into the mix just for fun, and just so everyone can go "Hang on, that's not green!". ^**lylgh
St_Custards_skin.jpg
St_Custards_skin.jpg (56.04 KiB) Viewed 13418 times
User avatar
Gumboots
CEO
Posts: 4813
Joined: Mon Aug 13, 2012 4:32 am
Location: Australia

Re: Southern Railways "Schools" V class [WIP] Unread post

Well I've just been revamping the UV mapping again. :roll: I think I have it right this time. I've managed to fit all major components in, with enough space left for the minor ones (not many of those) and all at the same scale so it makes sense when looking at it. Turned out that 24 pixels/RT3 unit (same as Blender unit for this exercise) was spot on. 25 was just a bit too big. The UV mapping has turned out to be the trickiest aspect. Doing the actual modelling isn't too bad at all, and the skinning is just fun.

I've also managed to get a bit more cunning with dropping vert and tri counts. I'm now confident it will come in well under the arbitrary 4,000 total. Will probably end up between 3800 and 3900. !*th_up*!
Jacmob01
Hobo
Posts: 10
Joined: Wed Jul 01, 2015 10:16 am
Location: Uppsala, Sweden

Re: Southern Railways "Schools" V class [WIP] Unread post

The locomotive is looking absolutely great! Keep up the good work (0!!0)
User avatar
Gumboots
CEO
Posts: 4813
Joined: Mon Aug 13, 2012 4:32 am
Location: Australia

Re: Southern Railways "Schools" V class [WIP] Unread post

w00t! I just figured out how to do the lining easily. :mrgreen: PS will do all sorts of stuff I've never used before, and this project is forcing me to learn about it.

So these choofers have lined panels all over the place, with multiple lines in different colours around the panels. Making convex rounded corners on rectangles in PS is easy (rounded rectangle tool) but the online tuts don't mention concave corners on rectangles. Turns out there's a fairly quick and easy way of getting clean results, which is what I was after.

The trick is to start with the polygon tool, and set the number of sides to 4. You then click and hold the small black down arrow, next to the icon for "custom shapes" in the top tool bar. This brings up the option to draw a star, and to set the depth of indent. So you set it to star, with maximum indent of 99%, and rounded indents. Radius to whatever suits. This gives you a basic four pointed star with rounded concave corners, in smooth vector format. Once you have this star, you can copy it and move it around to get other concave corners, before filling in between with the rectangle tool to give a full panel.

The shapes for all these bits will be on different layers, so use the trick of copy/pasting the vectors and then combining into one vector shape (like this). You will now have a rectangular panel with smooth, rounded corner cutouts.

All it needs now is lining. Best trick I've found so far is to use inner stroke and inner glow. Inner stroke keeps the corners of the stroke sharp. If you use outer stroke the corners will be rounded over, which doesn't look right for lining. Then apply an inner glow, with blend mode set to Normal, opacity to 100%, technique to Precise, source to Edge, and choke to 100%. Set the size to twice the stroke width. This gives the effect of an additional inner stroke, with no blurring.

Since this is still all in vector format, it can be scaled and stretched and whatever without pixellation. Result in screenshot. (0!!0)
Lining_test_stroke.jpg
Lining_test_stroke.jpg (70.26 KiB) Viewed 13327 times
Lining_test_shadow.jpg
Lining_test_shadow.jpg (77.53 KiB) Viewed 13327 times
Basic_lining_tests.jpg
Basic_lining_tests.jpg (22.51 KiB) Viewed 13327 times
User avatar
Gumboots
CEO
Posts: 4813
Joined: Mon Aug 13, 2012 4:32 am
Location: Australia

Re: Southern Railways "Schools" V class [WIP] Unread post

Haven't got into the lining yet, but progress has been made. This is the same green skin (Stroudley's Improved Engine Green :mrgreen: ) as shown before, but unlike the previous shot this one is almost fully skinned with real gfx, instead of mostly just using Blender materials. In this shot the only things not skinned are the pipes, and the connecting rods, coupling bars and pistons. Those won't be much drama to get sorted. The skin still isn't finished of course. It still needs a fair amount of detailing to bring it to life some more, but it's well on the way.

The tender shouldn't be much drama either. That has some rudimentary UV mapping done already, and it's a far simpler unit than the locomotive, and I'll have plenty of room on the skin image. Will get into that this week. !*th_up*!
Schools_class_mostly_skinned.jpg
Schools_class_mostly_skinned.jpg (75.79 KiB) Viewed 13314 times
User avatar
Gumboots
CEO
Posts: 4813
Joined: Mon Aug 13, 2012 4:32 am
Location: Australia

Re: Southern Railways "Schools" V class [WIP] Unread post

Had a brainwave about skinning. The 8 bit PNG I've been using for the skin, and which has the same colour range as an equivalent DDS, is giving banding and blotching across gradients on this livery. This is due to the 256 colour limit of the indexed palette not being adequate to draw the colour range smoothly.

The idea now is to use a TGA for the A skin, and maybe even for the B skin. Then drop back to DDS for the smaller skins, which wouldn't really look any better as TGA anyway, and get the better performance of DDS for those. The catch is getting a clean alpha channel on the A skin's TGA image so it won't glow in the dark. TGA doesn't do binary alpha by default and will have to be edited to suit, and editing every pixel of the alpha channel manually is a real PITA. I've done it, ages ago, and have no intention of doing it again.

So the brainwave is to do the usual save as DDS for all skins, then open the A skin DDS in Photoshop and steal its alpha channel. This can then be copy/pasted to the alpha channel of another image (that has a full colour range) to give clean edges for a TGA.

The only catch here is that any pixels within a layer that were partially transparent will be saved as a paler colour, due to the alpha channel's white (full opacity) bleeding through when saved as TGA. I can see a couple of ways around this. The first way would be to duplicate all PSD layers and scale duplicate layers up slightly, by about one pixel in all directions. If the duplicate layers are set behind the real ones, this should fix any partially transparent pixels within the areas you want at full opacity. Result should be clean edges, with no colour bleeding.

The other way, which will probably work just as well and may be easier, would be to simply merge the PSD to one layer, then duplicate the whole thing several times before merging it back into one layer*. This should increase the opacity of any partially transparent pixels to the point where they're close enough to full opacity. Once saved with the binary alpha channel pasted in, result should be clean edges again. (0!!0)

*So as an example, if you have a stray pixel at 10% opacity/90% transparency and you duplicate the layer, its effective transparency will now be 45%. Merge these two and duplicate again, and you're down to 22.5%. So after six steps your initial 90% transparency will decrease to 1.4% transparency, by which stage the bleeding of the alpha channel when saving as TGA will probably be unnoticeable.
User avatar
Gumboots
CEO
Posts: 4813
Joined: Mon Aug 13, 2012 4:32 am
Location: Australia

Re: Southern Railways "Schools" V class [WIP] Unread post

Hey I made it look worse again! ^**lylgh

I've had a bit of a session fitting in all the other bits that weren't UV mapped yet. This was just a ruthless "whack 'em all in and shuffle them around" deal. Blender's UV unwrapping doesn't seem that well suited to hard surface modelling. This may be down to me not knowing all the tricks yet, but I'm finding I have to go through unwrapped components and basically remap them myself with the aid of a calculator to get the right dimensions. This is where having a constant scale for all parts is handy, because I can grab an unwrapped monster mess and turn it into useful skin coordinates without much drama.

So anyway, things have been re-packed again. I have all current components on the 1024 skin image, with room for the last few finishing touches that haven't been meshed yet. I'll knock those off over the weekend. And you can forget my boasting about coming in well under my self-imposed 4,000 (verts+tris) limit. The way things are looking now, I'll likely come in smack on 3,999. These choofers have lots of bits on them. :mrgreen:

It's still be ok though. The double H10 test beast from a while back actually totalled a bit over 4,200 on highest LOD, so this little choofer will still be better than that. Lowest LOD will be as good as a single H10 too.

I'm pretty happy with the skin packing now, so will reshuffle the PSD layers to get things looking like they should again. !*th_up*!
ZOMFG_tis_borken.jpg
ZOMFG_tis_borken.jpg (104.81 KiB) Viewed 13280 times
Schools_total_UV_overlay.png
Schools_total_UV_overlay.png (176.87 KiB) Viewed 13270 times
Post Reply