Rolling Stock skinning ideas

Creating and Editing Rollingstock
User avatar
Just Crazy Jim
Dispatcher
Posts: 413
Joined: Fri Oct 14, 2016 9:57 pm
Location: Coal Fields of WV

Re: Rolling Stock skinning ideas Unread post

In looking over your DDS files for the Caboose mod, I discovered that you had somehow included mipmaps into the file. To avoid this, you add -nomipmaps at the end of the string inside the TGA_DDS.BAT file. If the DDS file has a mipmap embedded, the game is likely using that in preference to farming up the _B, _C, etc versions =OR= The EXE sees the mipmap, tries to use it, but really doesn't have proper coding to handle it, which is why they probably went with the _A, _B, _C thing. Also, worth noting, in my experience, the auto generated mipmaps made by the nVidia tool and GIMP DXT plugin are generally a lot more grotty looking than manually resized textures and have wrecked alpha channels. Although, whether they are more wrecked or less wrecked than the PopTop Train skinning tool, I can't say.

Code: Select all

nvdxt -file *.tga -dxt3 -nomipmaps
"We have no patience with other people's vanity because it is offensive to our own."
-- François de La Rochefoucauld. Réflexions ou sentences et maximes morales. 1665.
User avatar
Gumboots
CEO
Posts: 4813
Joined: Mon Aug 13, 2012 4:32 am
Location: Australia

Re: Rolling Stock skinning ideas Unread post

Ok. Didn't notice that, but I did check the skins at night and there were no alpha problems, AFAICT. If you've found any problems with the visuals, let me know and I'll re-do the pack.

The nVidia plugin for Photoshop has an option to disable generating mips. I just forgot to select it.
User avatar
Gumboots
CEO
Posts: 4813
Joined: Mon Aug 13, 2012 4:32 am
Location: Australia

Re: Rolling Stock skinning ideas Unread post

Aha! This just reminded me. I bet the problem I was having back here with some boxcar skins was due to the mipmap thing. !*th_up*!

viewtopic.php?f=67&t=811&start=170#p42039

I'll do them again and see if it fixes the problem.
User avatar
Just Crazy Jim
Dispatcher
Posts: 413
Joined: Fri Oct 14, 2016 9:57 pm
Location: Coal Fields of WV

Re: Rolling Stock skinning ideas Unread post

Gumboots wrote:Aha! This just reminded me. I bet the problem I was having back here with some boxcar skins was due to the mipmap thing. !*th_up*!

viewtopic.php?f=67&t=811&start=170#p42039

I'll do them again and see if it fixes the problem.
Yeps, that's what my comment was aimed at. I should have been more clear ... but here I was already doing three things at once when it occurred to me that the embedded mipmaps might be related to the problem you were having.
Gumboots wrote:Ok. Didn't notice that, but I did check the skins at night and there were no alpha problems, AFAICT. If you've found any problems with the visuals, let me know and I'll re-do the pack.

The nVidia plugin for Photoshop has an option to disable generating mips. I just forgot to select it.
I've never encountered any problems with your Cabooses (I luvs them), but I sometimes wonder if the game's camera based on distance is calling the right mipmap (be it loose or embedded). Even if I completely disable mipmapping in the video preferences, it seems to sometimes call the smallest texture. But this may be related to over-all GPU load when a man has 100+ trains running on a 1024x1024 map. **!!!**
"We have no patience with other people's vanity because it is offensive to our own."
-- François de La Rochefoucauld. Réflexions ou sentences et maximes morales. 1665.
User avatar
Gumboots
CEO
Posts: 4813
Joined: Mon Aug 13, 2012 4:32 am
Location: Australia

Re: Rolling Stock skinning ideas Unread post

I don't think it's related to load. More likely related to me not selecting the right export options. I'll give them the once over. Thanks for the heads up. (0!!0)
User avatar
Gumboots
CEO
Posts: 4813
Joined: Mon Aug 13, 2012 4:32 am
Location: Australia

Re: Rolling Stock skinning ideas Unread post

Hey I had a crack at those infernal A era pax cars. The dinky little ones we all love to hate. :-P

So the general style is right for the era, but the single coach nicked straight from a horse went out of fashion very fast, and the railway versions were usually three little coaches stuck end to end. I tried bodgeying those up out of the default skins over here, but the results weren't all that great. Apart from anything else it's a comparatively high-poly solution to the problem, due to trying to make the default skin do things it wasn't meant to. Then there's the hassle of trying to get accurate chunks out of the default skin so you can change colours without having raggedy edges all over the place. I was pigging around with that silliness and thought meh, time to upgrade my Photoshop skills again. If the mugs who made the skins originally could do fancy shapes, there must be a way I can do them too. There is. I found it. :-D

Short version is with a little bit of trickery you can treat vectors like ordinary raster layers and do anything you like with them, with the advantage being that the vectors give much smoother results. So know that I know I'm thinking this stuff is quick and easy, and why was I doing it the hard way for so long? *!*!*!

I whipped up new A era pax cars in Blender and skinned them up. Since all the tricky-looking bits are my very own vector layers, these things are infinitely scaleable and easily skinnable in different colour combos. They still need some detailing around the doors, which isn't going to be hard, and I'll probably tone down the default gruesome on the chassis a bit, but they're basically sorted.

So far I've tested five colour schemes. These work much better with the triple compartments than the default skin, and IMO don't look nearly as busy. They're easy on the eye even when you have a full consist of them. They all have yellow/gold curvy bits but that is a no-brainer to change if another colour is wanted.

For the main colours I was trying for plausible 19th century railway colours. Tuscan red is a classic, even well into the 20th century (used over here in Oz too). A rich brown is not bad either. I tried a couple of greens, and am inclined to think the sage is the better of the two. Also did a pale yellow, because that was actually quit popular for pax cars on early railways. Presumably because it's easy to make with yellow ochre and whiting, and looks quite cheerful. A range of other options are obviously possible. It's just a matter of playing with layer styles a bit to find more good combinations.

So these are shaping up well. They're something I'll be actually be able to enjoy using up until 1850. !*th_up*!
PassA_Tuscan.jpg
PassA_Brown.jpg
PassA_Green.jpg
PassA_Sage'.jpg
PassA_Yellow.jpg
User avatar
Gumboots
CEO
Posts: 4813
Joined: Mon Aug 13, 2012 4:32 am
Location: Australia

Re: Rolling Stock skinning ideas Unread post

Gave them another going over. I'm fairly happy with the detailing and the poly count is still reasonable for a basic cargo car.

The actual cars from the prior just had a single door to each compartment, instead of the double doors the default skins have. They were usually not quite so over the top curvy either, and had smaller windows than the RT3 glasshouses. So the new ones are now set up to give something pretty close to real cars of the era. !*th_up*!
Sorted.jpg
Obviously it would be pretty easy to reskin them in a different style too. This style is more British, or very early Baltimore & Ohio. Some of the early German cars, for example, gave the curvy stuff a miss and just used rectangular windows and lining on the same basic body shape.
User avatar
RulerofRails
CEO
Posts: 2061
Joined: Sun Dec 08, 2013 1:26 am

Re: Rolling Stock skinning ideas Unread post

These look much better IMO. !*th_up*!
Gumboots wrote:They were usually not quite so over the top curvy either, and had smaller windows than the RT3 glasshouses.
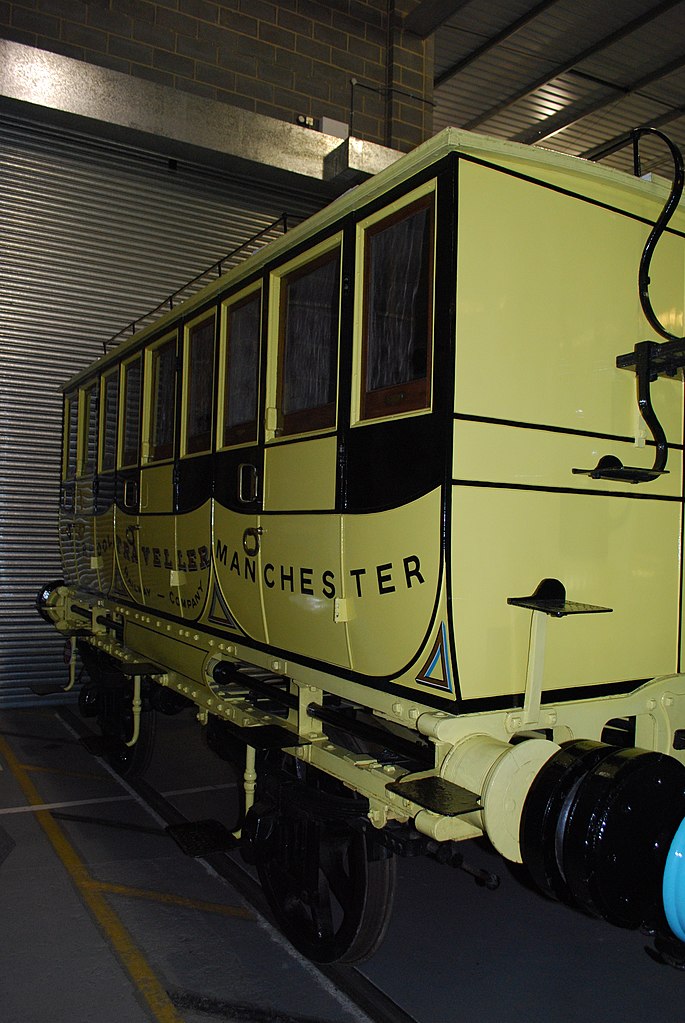
Maybe for a first-class car they are ok, but the volume of passenger traffic that RT3 has in the early years surely cannot be made up of all first-class passengers. Or maybe the history books are wrong and there were lots of rich folks back then. . . . !*00*!
User avatar
Gumboots
CEO
Posts: 4813
Joined: Mon Aug 13, 2012 4:32 am
Location: Australia

Re: Rolling Stock skinning ideas Unread post

Hey it's RT3. Everyone travels first class. :-P

If I do them as third class you can bet someone will grumble about them not being flash enough for hauling behind their ultra cool express choofer. I could do a composite carriage, with first and second class compartments, or first and third, but such things didn't exist this early in railway history. All carriages at this time were one class, so you have to pick one and go with that. First is the coolest. Everyone is gonna want their trains to be first class. :-D

Although...

I suppose...

since these early carriages are quite short...

some nutter could always double them up and have pairs of first and third class carriages.

Mebbe.

Not hard for mesh, but gets trickier than I want at the moment for skinning.
User avatar
Gumboots
CEO
Posts: 4813
Joined: Mon Aug 13, 2012 4:32 am
Location: Australia

Re: Rolling Stock skinning ideas Unread post

Got the dining car sorted too. Tis very posh. Defo first class. ^**lylgh

Dining cars didn't actually exist this far back. There was no access between carriages in this period, so even if someone had put a dining car on the end of the train none of the passengers would have been able to get to it. Unless they fancied swinging along the outside of the train like a mad gibbon, which is the sort of thing that might ruin your appetite anyway.

What did exist from fairly early on was what they called salon cars, which were basically just a first class car that had the internal partitions left out and real furniture added so you could all lounge around in luxury. As long as you didn't mind paying the extra price. And if you brought food with you, you could eat it at a table.

So that's what I've modelled and skinned it as. I couldn't find any drawings of one this old, so I just used my common sense and did it the way I would have done it if I was building one back then. Like obviously if you were paying a premium fare you'd want a small wood or coal stove to warm up a cup of coffee and toast your toes in winter. And a good view. Etc. (0!!0)
Revamped_Dining_A.jpg
There's a couple of minor details still to be sorted (dumb stuff I missed with the skinning) but it's basically at the stage where we just have to decide what colour people want them. Although I could easily do several options and just have swappable PK4's. Which sounds like fun. :-D
User avatar
CeeBee
Brakeman
Posts: 107
Joined: Thu Dec 27, 2007 5:46 pm
Location: Chase BC Canada

Re: Rolling Stock skinning ideas Unread post

Those green ones look pretty nice :)
User avatar
Gumboots
CEO
Posts: 4813
Joined: Mon Aug 13, 2012 4:32 am
Location: Australia

Re: Rolling Stock skinning ideas Unread post

Yeah they're pretty good in green. TBH I'll probably end up doing a few colours just for fun anyway.

I've had a bit more of a play with them. The proportions got tweaked to make them a bit more realistic. They were really too long before, and needed a bit more curvature in the sides. I've also added roof vents to give them a bit more feel and got the styling nailed down how I like it.
luxury_innit.jpg
The windows on the rear of the salon car look a bit off at the moment because I've been experimenting. :mrgreen: Since I was having to design this critter myself I got to thinking about ventilation and views and all that. This is too early for observation car platforms and vestibules but you could have had an opening window in the luxury car. So, as an old carpenter who has seen more windows in more states of repair than he cares to remember, I thought about how I'd do them.

Casements are good for most things, but would be a nuisance on a moving train if you only had access from the inside. Too difficult to open and close, and to secure when open. You'd probably either break the glass or fall out of the train. Bifolds rock when they're in good condition, but require fancy hardware and feel too complicated for a pre-1850 railway. Hoppers are good for ventilation in the rain but horrible for anything else.

So that really leaves the basic single hung sash as the best option. Not my first choice for a modern house, but if I was building a salon car in the 1840's and wanted to encourage rich customers to part with more cash, a single hung sash would be a good thing to have. Easy to make, and don't even need counterweights if they're fairly small. People usually end up propping them open with a stick in old houses, because invariably the old counterweight cord breaks and they can't be bothered disassembling the framing to fit new ones.

So I'm going to tweak the skinning so it has a nifty single hung sash in the middle at the back. Perfect height and size for a clear view out the back when you're sitting down, and would make a handy escape route if you got derailed and the car was on its side. (0!!0)

Now this is very much uber-posh top of the line stuff, so as RoR pointed out it's not going to look right if you're shunting pax between mining towns, but that's just a few layers in Photoshop and they can easily be skinned as something a bit plainer. I'll experiment with skinning a composite first/third car just to have something that's more widely applicable. This isn't period-correct AFAIK since in those days, at least outside the US, third class cars were usually open cars with bare wooden benches thrown in and a different paint job to put lipstick on the pig. They didn't have glazed windows and you were lucky if you even got a roof. But we don't really have to be obsessively period-correct (it's only a game, right?), and since composite first/third and second/third class cars with windows were fairly common in the 1850's I think there's no harm in fudging things a bit. These things are long enough to have four compartments: 1x first, and 3x third. Which would be a more realistic balance for people who worry about such things.
User avatar
Gumboots
CEO
Posts: 4813
Joined: Mon Aug 13, 2012 4:32 am
Location: Australia

Re: Rolling Stock skinning ideas Unread post

Ok, composite cars. ^**lylgh

One first class compartment, one smaller second class compartment, and two minimum-width third class compartments. This isn't fully finished yet, just a quick go at it to see how it looked for balance. And, after doing it and looking it over I realised something.

The front of the car is not the logical place for the first class compartment. You'd get a smoother and quieter ride in the middle of the car. Further away from coupling noise, and less pitching over lumps and track joints. So really it should have the second class compartment up front, the two third class compartments in the rear, and the first class in the middle. Which is easy enough to change since it's just Photoshop layers and not a real car. *!*!*!
meh.jpg
User avatar
RulerofRails
CEO
Posts: 2061
Joined: Sun Dec 08, 2013 1:26 am

Re: Rolling Stock skinning ideas Unread post

Did you try the green color in-game? It may be hard to see especially at night, in which case the Yellow may be better. **!!!**
User avatar
Gumboots
CEO
Posts: 4813
Joined: Mon Aug 13, 2012 4:32 am
Location: Australia

Re: Rolling Stock skinning ideas Unread post

No I haven't got around to trying them in the game yet. The night visibility won't be a problem, because all those windows will glow like crazy. ;-)

I'll check for visibility around dusk and dawn, when the game turns off night glow but ambient light levels are still low. I think it'll be fine, but it's easy to change.

Anyway, I reached the point I seem to reach in all my "quick adjustment to default stuff" projects, when I realise it's lost the plot and I really should re-jig everything to get it to make sense. *!*!*! The standard car and salon car were using different UV mapping where they didn't really need to, and leftover bits of default mesh were at odd dimensions, and/or weren't really necessary, old bits of skin were getting in the way of what I really wanted to do, etc etc. So I said rude words and just rebuilt the entire model from the ground up and re-mapped all the UV's. This way it's less drama for me to finish them off now, and less drama do variants and skins in future if anyone wants to.

I've just finished that process, but haven't got around to moving the Photoshop layers yet. The combination of new mesh and old skin is awesome. I'm calling it the Mad Max Greenhouse And Thunderbox On Wheels. :mrgreen:
Mad_Max_greenhouse_and_thunderbox_on_wheels.jpg
So I'll fix the PS side of it and then see about giving them a test run with proper game files. I figure it'd be good to have five variants, since they're so easy to do and I'll probably feel like using different ones at different times.

1/ The salon car, obviously.
2/ First class car, three compartments, with all the shiny bits.
3/ Second class car (basically, just switch off a few layers in PS and change some letters).
4/ Combination first and second class (first class in the middle, second class at each end).
5/ Third class car (with four smaller compartments, basic lining, smaller windows, etc).

That should cover all bases. (0!!0)

Edit: D'oh. It'd be perfect for a mail van too. Might as well.
User avatar
Gumboots
CEO
Posts: 4813
Joined: Mon Aug 13, 2012 4:32 am
Location: Australia

Re: Rolling Stock skinning ideas Unread post

This rationalising stuff works a treat. !*th_up*!

I've roughed out skins for 1st class cars, combined 1st and 2nd, 2nd class, 3rd class, and the mail van. They still need a bit of detailing but they're generally on the money IMO, except for the mail van. I feel that needs a little something extra. Will play around with windows and a few other bits and see what works. Haven't done the salon car yet but it won't be hard.
first_and_combined_cars.jpg
2nd_and_3rd_class_cars.jpg
mail_van.jpg
consist_1.jpg
This should be a good base model for Euro/UK coach stock right into the early 20th century. The nutters kept using these things for ages. The later ones were longer and had an extra axle in the middle, but that's just a matter of stretching the mesh and throwing a couple more bits underneath. Piece of cake. (0!!0)
User avatar
Gumboots
CEO
Posts: 4813
Joined: Mon Aug 13, 2012 4:32 am
Location: Australia

Re: Rolling Stock skinning ideas Unread post

w00t! I just found a genuine composite 1st/2nd class carriage from 1838. :-D

And, it has the first class compartment in the middle, with the second class compartments at each end. Where the ride would be rougher. Like I surmised. I feel clever now. ::!**!

Bodmin & Wadebridge Railway 1st 2nd Class Composite carriage
User avatar
RulerofRails
CEO
Posts: 2061
Joined: Sun Dec 08, 2013 1:26 am

Re: Rolling Stock skinning ideas Unread post

At first glance the mash-up looked like a coffin car to me. :lol:

Interesting that you found real composite cars. Good design instincts on your part. !*th_up*! It's good to have this for later reference as no doubt someone will ask about them in the future.

Sorry, don't have a good idea about the mail cars. Because we will often see more than one car per train they can't logically represent "Post Office cars". Perhaps RT3's "Mail" car is best described as a hybrid between this and a Baggage car.
User avatar
Gumboots
CEO
Posts: 4813
Joined: Mon Aug 13, 2012 4:32 am
Location: Australia

Re: Rolling Stock skinning ideas Unread post

RulerofRails wrote:At first glance the mash-up looked like a coffin car to me. :lol:
Hadn't thought of it that way. I could trick it out in blue and gold and call it the King Tut Special. :mrgreen:

I agree about the mail car. Baggage cars often did carry mail, at least in some places. Or mail cars carried baggage. Whichever way you want to look at it. Anyway I figured out what was wrong with it. It's the old "don't put two windows side by side on a large wall because they'll look like an idiotic pair of eyes". Well known in building design, but I'd forgotten about it. Easy to fix.

I had a brainwave about buffers too. The ones in the earlier shots had the body of the buffer made out of a cone with the tip alpha'd out. This was a compromise between looks and poly count (like everything) but I wasn't happy with it. So I was looking into how early buffers actually functioned and this gave me an idea.

The early ones have an iron rod running back towards the middle of the car, like this:

Image

After looking into it I found a diagram which shows the mechanism.
London_Birmingham_2.jpg
The buffer block at each end is just a solid wood block with a hole drilled through it, which acts as a guide for the iron bar. The inner end of the iron bar reaches back to a large transverse leaf spring hidden under the centre of the car, and this is what gives the shock absorption. There also appears to be a second set of springs dedicated to giving shock absorption for the drawbars. Which is all perfectly logical now that I see it, but hadn't occurred to me before.

So I had been thinking about running the buffer rod back to near the centre of the car and using alpha to skin the early style of frame with cut-away side sections. Then I thought hang on, why stop there? If there's space on the skin (and it turns out there was) the better option would be to make the mesh for the buffer rod continuous from one end of the car to the other. In terms of poly count this literally gives you two for the price of one. So then I thought well hey, I can do that for the buffer blocks too. That saves even more tris, because that's where the majority of them are. If I or anyone else wants to skin the early style cutaway frames, all that's needed is to alpha out the section of the block mesh between the front and rear cross beams.
buffers_1.jpg
So this works. :-D To save space I used a much smaller scale for the buffer block skinning but it's still workable for detailing. The test layer style has a 3px stroke at each end of the visible block, and is sufficiently clear to be useful. The limits of the alpha'd chunk in the middle are chosen to match the length of the car's frame (has to be worked out in whole pixels). The result is a low-poly buffer that's compatible with any style of frame, and looks a lot better than what was there before. (0!!0)
User avatar
Gumboots
CEO
Posts: 4813
Joined: Mon Aug 13, 2012 4:32 am
Location: Australia

Re: Rolling Stock skinning ideas Unread post

^**lylgh Hey I just found out something, fortunately in time to stop me doing something stupid.

So I had modelled low-poly "roof vents" for these cars, on the assumption that the funny-looking small things up top in the old photos and plans must have been roof vents. I figure they were probably a variation on the basic mushroom vent, or something similar.
Nord_Belge_1860.jpg
Umm, no. They are actually lights. *!*!*! I know this because I just found a good cross-section of an express car from roughly the same period (haven't checked the exact date yet).
not_vents.jpg
They are clearly not vents, since the actual vents are also shown. The only logical explanation is that they are old oil or kerosene lamps of an unusual form, with the lens at the bottom of the lamp and the fuel tank above it. I assume they used this type of lamp to keep smoke and fumes out of the interior.

This also explains why a lot of the old European express cars had a catwalk along the roof. I thought it was so the crew could get from one end of the train to the other if necessary, but apparently they generally used the low-level running boards (each side of the car) for that. The roof catwalk would have been for the poor mug whose job it was to get up there and re-fill all the oil lamps.

So it's good that I found this before I got into finalising the skinning, because I was just thinking about how I'd do the air holes and drainholes for the "vents". Which I obviously will not be doing now. :-P
Post Reply